Monday, February 27, 2012

DIY: Acrylic Tray.

I've been wanting a Clear tray for some time now but obviously am not willing to pay $100 for one since its not actually a "need" --- Not that anything I blog about is ever a "need," usually a "want." Sickly I always seem to find a way to justify a purchase. Not a healthy or proud habit of mine but at least I can admit it. Anyways... With my newly enormous amount of free time and constantly being inspired by all the wonderful treasure in NYC stores and Pinterest, I figured I could make one of these unnecessary objects myself. This one was my test and after completing it, I realized just how creative and personalized you could make one of these. You could add a monogram and choose your design. So many possibilities with this little project to add your own personal touch. I'm thinking great gift idea right now if your not picking up on my drift!! Anywho-- pics and how to are below in case you need a project, a gift or your just feeling like a crafty little creature today. Not going to lie, I was hesitate to do leopard because I feel like its kind of cliche but I'm actually really digging my finished product with my accessories. You just can't go wrong with a good animal print. :)
Tray: Container Store - $15 (Similar option here.) Leopard Paper: Container Store - $5

Gloves: Ted Baker - $50. Lipstick: Mac"Snob"- $14.50. Perfume: Michael Kors "Island" - $70.00. Jewelry: David Yurman , JCrew, F21 and Thrifted.

What You'll Need:
-Scissors
-Razor Blade
-Mod Podge - Clear
-Paint Brush
-Clear Tray (Similar option here.)

Steps:
1) Layout your wrapping paper print side up.
2) Flip tray over and paint on a thin layer of Mod Podge.
3) Lay down on paper where you would like it positioned on the print and then smooth out so there are no bubbles. Let this dry for a few hours.
5) Once Dry..Flip over and add a layer of Mod Podge to the back of the paper so it had a good hold.
5) Let dry for about an hour (this should dry faster since it is being exposed to air) and then cut out paper around tray with a razor blade.
Simple as that! Pics below...

INSPIRATION...
Click to buy here.

Monday, February 20, 2012

DIY: Boho Necklace.

I bought this really cute necklace last week at F21 and thought I would make a little update so it looked more expensive and on trend for this season. This is such an easy project anyone can do and a great way to show your personal style by choosing what you use for the tie.

NECKLACE BEFORE:

What you'll Need:
-Scissors
-Small Pliers
-Super Glue
-Fabric or Ribbon of your choice
Steps:
1) Remove old chain with pliers and replace with a jump ring on each side. 2) Trim leather into long strips long enough to tie around your neck. 3) Loop leather strips around ring and glue. 4) Tie together. 
(Note: You don't have to glue, you could always just tie the strings and change out the ribbon to match your different outfits.)
10 Minutes and $10 Later...
Your very own one-of-a-kind necklace. Happy jewelry making!!!

Sunday, February 19, 2012

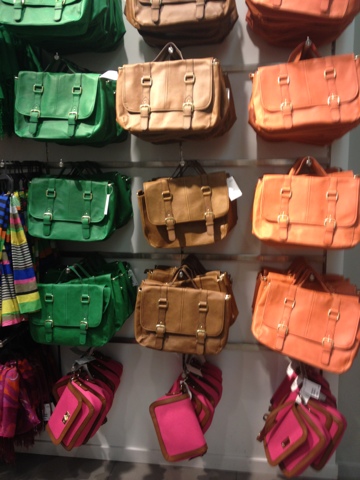
Trend Alert: Pop Of Color - Handbags.


Obvi-- Color blocking is so in for spring and it makes me so happy!! Actually, I'm just overly excited that color is probably the biggest trend of the season in general this year. Last year, I seriously felt like I was the only person in New York that had something in their wardrobe besides black. Yes, even during the dead of summer I was that girl who looked like I had just got off from working my shift at the carnival walking around Manhattan. Even if your not the type to go all out with this trend you have to at least accessorize a few pieces in your wardrobe.  You can add color with a scarf, a chunky necklace, shoes and even your handbag. I could post so many things wonderful and affordable accessories that would be great to add to your outfit, but today Im going to focus on handbags.... Because every girl has to carry one of these.  All of the bags below would work perfect if you are wanting to add another color element to a sleek colorblock look or if you are just wanting to jazz up a more neutral look for spring. Did I mention these are all under $50 too?? ... Now get to shopping!
H&M: All Bags - $24.95
Have A Colorful Monday!!!

Tuesday, February 14, 2012

Be Mine.

Just a few snap shots of the cake I baked last night...
Happy Valentines Day Everyone!!!

And my pretty flowers from Kev-- such a sweet boy ;)

Outfit Post: Fresh- Black & White.

Jacket: French Connection. (Now on sale!) Skirt, Top & Shoes: Joe Fresh. Sunglasses: RayBans. Necklaces: Anthropologie & Max and Chloe. Earrings: Christina Greene. (Similar)

Be sure to check out my good friend Christina Greene's-- handmade and one-of-a-kind pieces on her website here and "like" her facebook fan page here.

Saturday, February 11, 2012

DIY: Wall of Art.

Who doesn't like a little change every now and then? I especially find myself constantly wanting to change things around my apartment because I spend so much time here and its easy to grow tired of. I tend to want to change things in my apartment too often because I love experimenting with new decorating ideas. 

Well yesterday I decided I needed a project and I was due for a little change in my room before the start of the next season--- Down came all my art from my walls. I have always loved art and pictures but tried to not get carried away with buying too many things to hang on the wall since my wall space is limited in a small New York apartment. Its been almost 2 years since I have been living here and lets just say that I failed and now have more things to put on the wall then I know what to do with. As I have slowly collected things that I wanted to display, I have been hanging them wherever I found an empty space on my walls. For some time now my frames have started to look sloppy and scatted. 

A roll of wrapping paper, a hammer, a few nails and an hour later I had created a beautiful wall of art that shows all the things I love and collected since living in New York. I never realized how moving everything to one wall would really showcases the things that inspire me and my personality so well... I kinda love it!

How I made my wall of art so you can make one too...
What you'll need: 
-Large pieces of paper (I used left-over wrapping paper from Christmas which worked perfectly) 
-Scissors
-Tape
-Hammer & nails

Measure and cut the paper into the size of each of the frames you are wanting to hang.
Once they are all cut, I laid them all out on the floor and just started taping them to the wall where I thought they should go. You can measure them out with a tape measure but I found it easier to just eye it and try to keep the distance between each frame consistent and evenly spaced.
Once you pleased at how they are arranged on the wall, start hammering and re-hanging. (oh, and don't forget to take down the paper). Once you get them all hung and you are pleased with your placement, step back and take it all in. I think you will be happy with your little shrine. I am very happy with my finished look...

A LITTLE INSPIRATION...
Happy Hanging and Weekend!!....Xoxo - Claire

Tuesday, February 07, 2012

Creative Resume Ideas- Part II.

I did an earlier post last year of the creative resumes I designed and sent out to employers that were suppose to resemble a hang tag. I thought this would be a creative and catchy way to make me stand out among the other million resumes they receive every year. My whole goal is to just get it in the hands of someone in HR who is hopefully curious to find out what is enclosed in the fancy envelope. From the outside I think it looks a lot like a party invite -- (Hope they are not disappointed when they open it :/ )
After recently being laid off from my job, I decided I would try this strategy (what I like to call: "Marketing Me") again since it did get me a temp job at Tory Burch a year ago. Below I posted images of the final products since I made a few changes and added some new details and designs from my old versions. I even printed stationary and business cards to match, much like an actual companies marketing/branding materials. I mailed them on Sunday morning so I am assuming employers will get them today or tomorrow... Let's just hope that I hear something back in the next few days!.... Please leave comments-- I would love to hear your feedback!!

Thursday, February 02, 2012

DIY: Cake Plate.

Thanks to my recent edition of "Do it Yourself" magazine I was inspired to make a cake plate yesterday which I've been meaning to buy forever now since one of my newest hobbies is baking. Seriously this is one of the simplest projects I've ever done and only cost me a total of $8. I found both the candle stick holder which I used as the stand and the plate at a local thrift store yesterday in the upper east side. The pictures below show my step by step process and my finished product. This would make the perfect gift for any girl who loves to bake or to just display in the kitchen. Have a thrifty Thursday!
Magazine Idea Page:
Step-by-Step Process:
Ta-Dah!